Lab Build
- Overview
- Build Hyper-V Virtual Machines
- Initial VM Configurations
- Domain Controller Configuration
- Prepare AD for Microsoft Configuration Manager
- Install Configuration Manager Prerequisites
- Install Central Administration Site (CAS)
- Install Child Primary Sites
- Apply Microsoft Configuration Manager Updates
Overview
I support a complex Microsoft Configuration Manager instance professionally. I decided a long time ago that in order to keep my skills current and learn new things, I needed my own Microsoft Configuration Manager playground. I have investigated a few of the methods to spin up pre-built instances but none I found were designed with a Central Administration Site in mind and I wanted my lab to more closely resemble the environment I support. Plus having to rebuild the environment regularly as trial licenses expire has been a good learning experience to drive automating new steps each time I need to tear it all down and start over again.
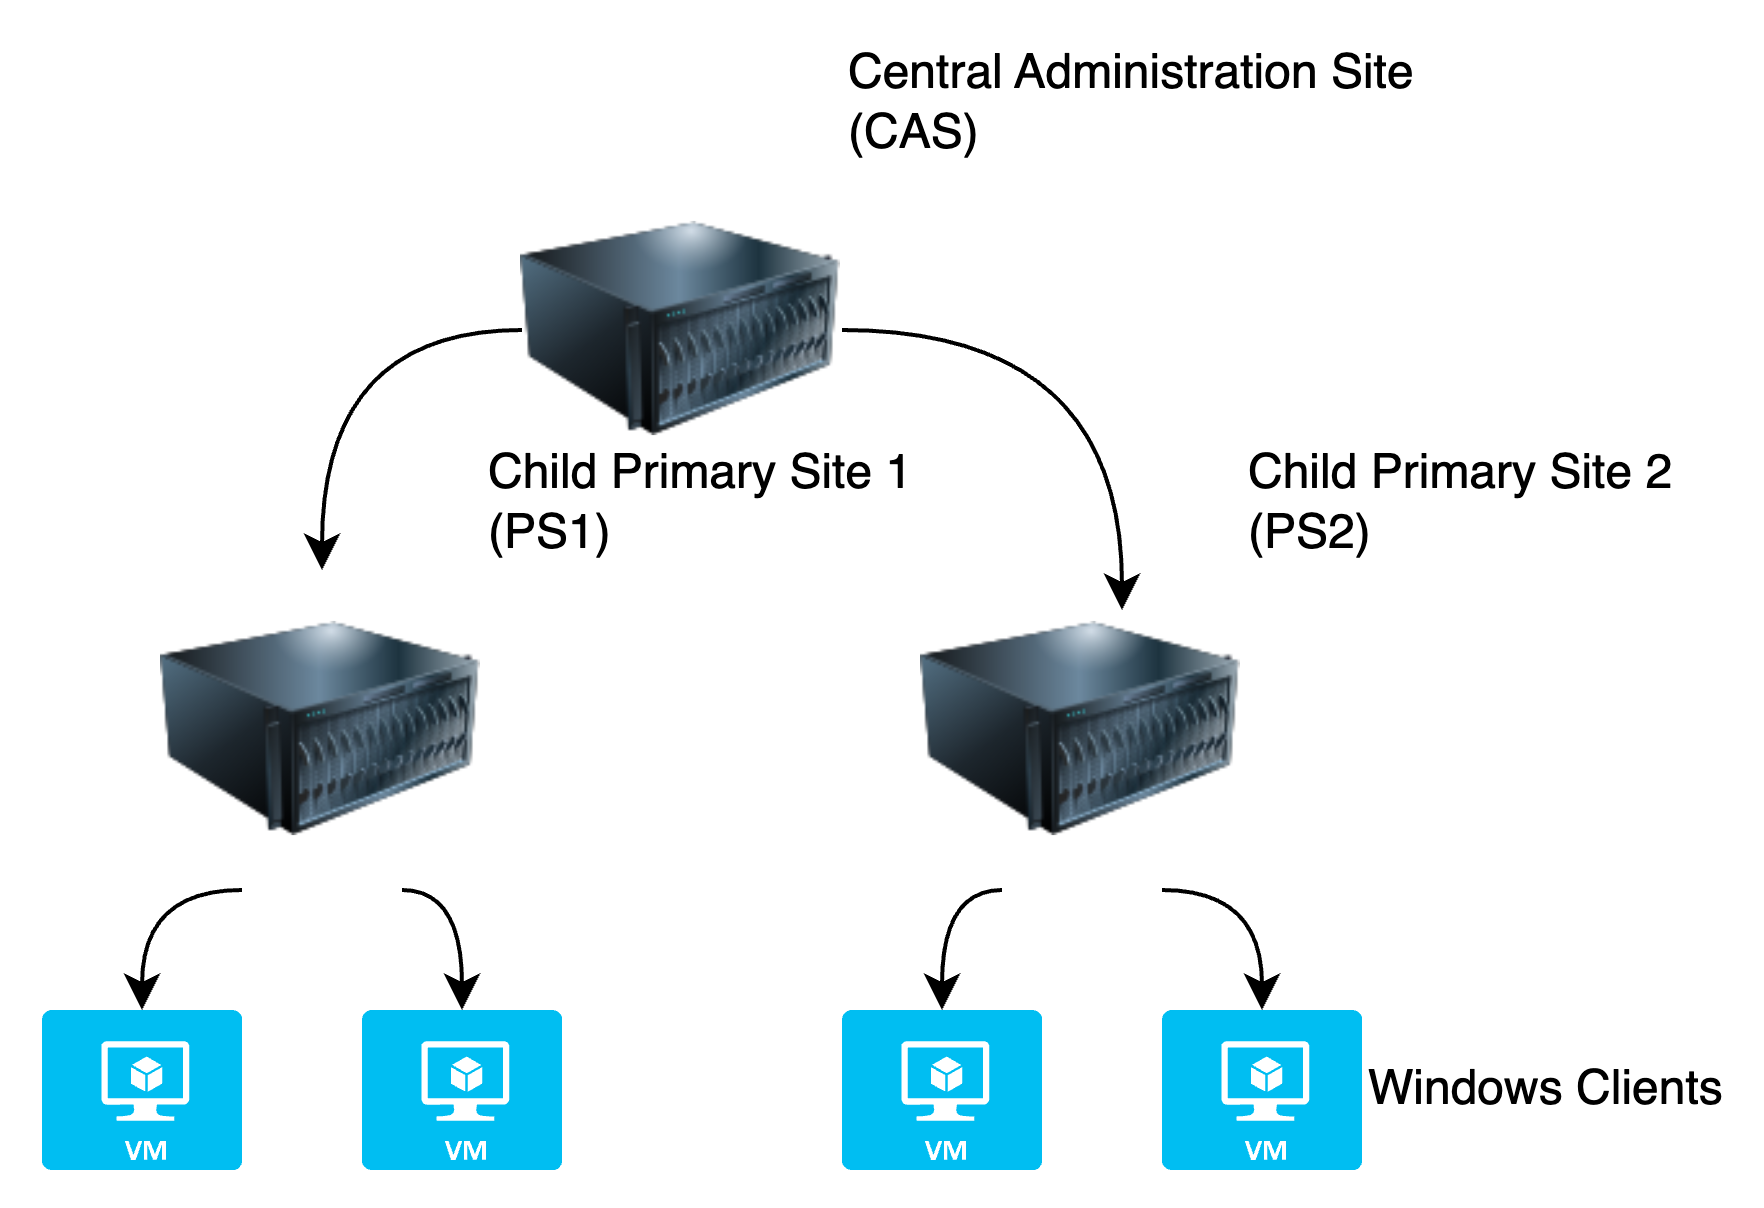
The lab environment consists of an Active Directory domain and three additional Windows Server virtual machines running Configuration Manager and SQL co-located on the same system. There is a Central Administration Site (CAS) and two Child Primary Sites (PS1 and PS2). Additionally, there is a Windows 10 and a Windows 11 client assigned to each site.
Build Hyper-V Virtual Machines
In total when I am building the lab environment I start with seven Windows VMs with a mix of sever and client operating systems. While it doesn't take much time to create a VM and make the necessary changes, there is no reason not to automate it if you can, especially since some of the necessary changes are not available in the creation wizard and have to be modified in the properties after creation.
Manually, I would open Hyper-V Manager and create a new VM. The wizard allows you to specify the Name, Location, Generation, Memory allocation, Virtual Switch, Virtual Hard Disk (VHD) name/size/location, and ISO used for installation. In order to complete the configuration, you the need to go into the properties of the VM and adjust the number of processors allocated and adjust the network adapter to use the VLAN used on my lab's subnet. For the few Linux VM's, secure boot also often needs to be disabled.
PowerShell allows all of these to be set within one script with updating a few variables or importing all of the details from a .csv file. I just update the variables and run and it takes care of all of the manual configuration steps. Once all of the settings are in place it will launch vmconnect.exe to open a console session for the OS to be installed. I commented out the Start-VM as by the time the console launches the "press any key" has timed out and the system needs to be restarted again.
$VMName = 'Name'
$Memory = 8GB
$BootDevice = 'VHD'
$VHDPath = "C:\$VMName\Virtual Hard Disks\$VMName.vhdx"
$Path = "C:\"
$NewVHDSize = 50GB
$ISO = "Path to ISO"
$CPU = #
$VLAN = 'VLAN ID'

New-VM -Name $VMName -MemoryStartupBytes $Memory -BootDevice $BootDevice -NewVHDPath $VHDPath -Path $Path -NewVHDSizeBytes $NewVHDSize -Generation 2 -Switch External
$DVD = Add-VMDvdDrive -VMName $VMName -Path $ISO -Passthru
Set-VMProcessor -VMName $VMName -Count $CPU
Set-VMFirmware -VM (Get-VM -Name $VMName) -FirstBootDevice $DVD
Set-VMNetworkAdapterVlan -VMName $VMName -Access -VlanId $VLAN
#Start-VM -Name $VMName
vmconnect.exe {HV Host} $VMName
Initial VM Configurations
Once VMs are built and the OS is installed, there are some common things that need to be done all of them - renaming the system, setting a static, IP, correcting the time zone, etc. This is again a great task for some PowerShell.
# References -
# https://www.pdq.com/blog/how-to-use-powershell-to-set-static-and-dhcp-ip-addresses/
# https://www.thewindowsclub.com/enable-remote-desktop-using-command-line

#Set Variables per device
$ComputerName = "NewName"
$IP = "xxx.xxx.xxx.xxx"
$Domain = "domainname"

#These shouldn't need to change
$MaskBits = 24 # This CIDR notation means subnet mask = 255.255.255.0
$Gateway = "xxx.xxx.xxx.xxx"
$Dns = "xxx.xxx.xxx.xxx"
$IPType = "IPv4"

#Rename Computer
Rename-Computer -NewName $ComputerName

#Configure Static IP
# Retrieve the network adapter that you want to configure
$adapter = Get-NetAdapter | Where-Object {$_.Status -eq "up"}
# Remove any existing IP, gateway from our ipv4 adapter
If (($adapter | Get-NetIPConfiguration).IPv4Address.IPAddress) {
 $adapter | Remove-NetIPAddress -AddressFamily $IPType -Confirm:$false
}
If (($adapter | Get-NetIPConfiguration).Ipv4DefaultGateway) {
 $adapter | Remove-NetRoute -AddressFamily $IPType -Confirm:$false
}
 # Configure the IP address and default gateway
$adapter | New-NetIPAddress `
 -AddressFamily $IPType `
 -IPAddress $IP `
 -PrefixLength $MaskBits `
 -DefaultGateway $Gateway
# Configure the DNS client server IP addresses
$adapter | Set-DnsClientServerAddress -ServerAddresses $DNS

# Set Time Zone
Set-TimeZone “Eastern Standard Time”

# Validate Server and if so disable IEESC
$ComputerInfo = Get-ComputerInfo
If ($ComputerInfo.OSProductType -eq 'Server')
{
    $AdminKey = "HKLM:\SOFTWARE\Microsoft\Active Setup\Installed Components\{A509B1A7-37EF-4b3f-8CFC-4F3A74704073}"
    Set-ItemProperty -Path $AdminKey -Name "IsInstalled" -Value 0 -Force}

#Enable Remote Desktop
Set-ItemProperty -Path 'HKLM:\System\CurrentControlSet\Control\Terminal Server'-name "fDenyTSConnections" -Value 0
Enable-NetFirewallRule -DisplayGroup "Remote Desktop"

#Add Devices to domain (Assuming the Domain Controller has been configured)
Add-Computer -DomainName $Domain -Restart
Domain Controller Configuration
Pretty much every organization I've worked with has leveraged an Active Directory Domain in some at least some capacity. Active Directory (AD) is a centralized database for managing users and computers in a company's network. Both of these can be added to groups and used to assign permissions, centrally control identities which can be tied into authentication using various components, set minimum password requirements, and leverage Group Policy which allows you to manage thousands of settings to ensure a consistent experience without manually configuring them.
A domain needs to have at least one Domain Controller (DC) which runs the Active Directory Domain Services role. Ideally two or more will exist for redundancy and load balancing. At the most basic level, getting a domain set up involves installing the role through PowerShell or the Add Roles and Features wizard. Once completed, the server needs to be promoted to a domain controller which can also be done through a wizard where you can either create a new domain and forest, set the functional level, and get things up and running. The local Administrator account gets converted to your first Domain Administrator account and once the server reboots at the end of the process, you have a functioning domain. DNS will need to be configured for clients to find the domain controller and allow other servers and workstations to be joined to the domain.
To install the necessary roles:
- Log into the server and Launch Server Manager.
- Go to Manage > Install Roles and Features.
- Click Next until you can select the roles and select Active Directory Domain Services and DNS Server (install management tools as well).
- Before clicking on Install, you can export the configuration settings to an .xml file which can be imported on future systems with
Install-WindowsFeature -ConfigurationFilePath c:\example\configuration.xml.
Alternatively, the roles can be installed entirely through PowerShell without the .xml file. The name of the features can be obtained by running Get-WindowsFeaturewhich will also confirm which are installed.
Install-WindowsFeature -Name AD-Domain-Services -IncludeManagementTools
Install-WindowsFeature -Name DNS -IncludeManagementTools
Once the roles are installed, Server Manager will show a ! in Notifications stating configuration is required for ADDS on the DC with a link to the DC Promo wizard. To do this through the UI:
- Select Add a new forest as this is the first server in the domain. Specify the fully qualified root domain name (domain.com or domain.local). There is plenty of debate whether this should be an internet routable domain or not and both have their advantages but as this is a lab I'm not worried.
- Select the Forest/Domain Functional level. This controls which features are available and despite there being a Server 2019 and Server 2022 released, Server 2016 is the latest new functional level. This should be the latest unless there are older servers which are no longer supported. The Directory Services Restore Mode (DSRM) password also needs to be specified. This is hopefully something never needed as it helps recover a corrupt database and do other offline maintenance. It is one of those things that should be documented and secured well in hopes it is never needed. This can be changed later using ntdsutil.
- Skip setting up DNS delegation.
- Verify the NetBIOS domain (the short name).
- Leave the default locations for the database, log, and SYSVOL folders.
- Click Next through the rest of the wizard until you can select Install.
- The server will reboot automatically upon completion. You can no longer sign in with the local account which is now your Domain Administrator.
Again, this can also be exported to a PowerShell file that can be used instead of the wizard. This will prompt for the DSRM password and will also reboot automatically upon completion.
Import-Module ADDSDeployment
Install-ADDSForest -CreateDNSDelegation:$false -DatabasePath "C:\Windows\NTDS" -DomainMode "WinThreshold" `
  -DomainName "DOMAIN.LOCAL" -DomainNetbiosName "DOMAIN" -ForestMode "WinThreshold" `
  -InstallDNS:$true -LogPath "C:\Windows\NTDS" -NoRebootOnCompletion:$fasle `
  -SysvolPath "C:\Windows\SYSVOL" -Force:$true
Prepare AD for Microsoft Configuration Manager
Extend AD Schema
Now that the domain is functional, since this setup will leverage Microsoft Configuration Manager, there is some additional set up that needs to be done to prepare for installation. First, I want to extend the AD Schema which will add additional properties to the AD database that will be useful for managing devices. Simply run the script included with the Microsoft Configuration Manager setup as an account with the Schema Admin role. This is a very quick process and only needs to be done once per forest so if upgrading from a previous version or rebuilding in an existing domain not needed.
To extend the schema:
- Log into the domain controller, or any other domain joined server, as a Schema Admin (the account used to create the domain has this by default).
- Navigate to your MCM install source and go to .\SMSSETUP\BIN\X64.
- Run extadsch.exe. A command prompt window will launch and almost immediately close itself.
- Validate everything worked by reviewing c:\ExtADSch.log. The log file shows which attributes and classes were added and will ideally say "Successfully extended the Active Directory Schema". It also warns that there are additional configurations that are needed.
Create AD Accounts and Groups
Not everything is going to be done as a Domain Admin since we should use the principle of least privilege. I create a few accounts for the SQL Admin, Network Access, MCM Admin, Client Push, etc. In order to create an AD User there are many properties that can be set, but very few are actually required. Each account needs a Name, Logon Name, and Password. Optionally creating the account through AD Users & Computers or AD Administrative Center allows you set additional properties at creation but others need to be changed after created.
One of the first things I always do when launching AD Users and Computers (dsa.msc) on a new system is go to View > Advanced Features. This enables a few additional tabs such as Object and Attribute Editor which are very valuable when troubleshooting account issues.
As this is one of the things that gets done all of the time and manual steps add room for error, I create the accounts and groups using PowerShell with Read-Host to set the password for the account. There are many other properties that can be set if this were a production environment. These can be explored with Get-ADUser -Properties * | Get-Member. For example, people like to use First and Last name (GivenName and Surname). These can also be set and/or added later with Set-ADUser.
# Create New User
New-ADUser `
    -Name "AccountName"`
    -SamAccountName "LogonName" `
    -AccountPassword (Read-Host -AsSecureString "Input User Password") `
    -ChangePasswordAtLogon $False `
    -Description "AccountDescription" `
    -Enabled $True

# Create New Group
New-ADGroup `
	-Name "GroupName" `
	-SamAccountName "GroupName" `
	-Description "GroupDescription" `
	-GroupScope "Global"

# Add Member to Group
Add-ADGroupMember -Identity "GroupName" -Members "sAMAccountName"
By default, new User and Computer objects get added to the default Users and Computers container. The default location can be changed using the redirusr.exe and redircmp.exe utilities. Once the new OU has been created simply run the appropriate utility and point to the Distinguished Name (DN) of the desired OU. For example - redircmp.exe OU=Computers,OU=Company,DC=Domain,DC=local.
Configure System Management Container
MCM leverages a System Management Container in AD to store information used by the MCM servers to store and publish information such as boundaries and certificates. As the log for extending the schema indicated, this is not done automatically so needs to be created with ADSI Edit and permissions for the site servers granted by an account with Schema Admin.
- Launch ADSI Edit as an account with Schema Admin
- If this is the first time launching the tool, a connection needs to be established by selecting Action > Connect To. Leave the default options and click OK.
- Expand Default naming context > DC=domain,DC=local > CN=System.
- Right click CN=System and create a New Object.
- Select container from the available classes and press Next.
- Enter 'System Management' for the value and leave the rest of the default options to finish the wizard.
- Right click the new CN=System Management container and open the properties.
- On the Security Tab add the computer account for the site server(s) or a group with the servers. To select the Computer Account, you need to click Object Types and add Computers.
- Select Full Control and click Advanced.
- Edit or Double Click each server or the group and change Applies to: from 'This object' to 'This object and all descendant objects'.
- Apply and click Ok to close out of the properties.
Install Configuration Manager Prerequisites
The installation of Microsoft Configuration Manager requires may different roles and components to be installed prior to getting a functional MCM install up and running. Most of these are straight forward but making sure they are all installed is critical in ensuring there are no errors with the Prereq check and avoiding troubleshooting failures. Not all of these are strictly necessary depending on which roles will be used and what workloads are needed. I am an advocate of knowing how to do things manually but https://github.com/MSEndpointMgr/ConfigMgrPrerequisitesTool/releases does look promising to assist in downloading and installing the list. Maybe someday, I'll test it out.
Roles and Features:
- .NET Framework 3.5/4
- Internet Information Services (IIS)
- Remote Differential Compression (RDC)
- Background Intelligent File Transfer Service (BITS)
- Windows Server Update Services (WSUS)
Applications:
- Microsoft SQL Server
- Microsoft SQL Server Management Studio
- SQL Server Reporting Services
- SQL Report Viewer
- Windows Assessment and Deployment Toolkit (ADK)
- ADK Windows PE (Preinstallation Environment) Add-On
Install Roles and Features
As discussed in a previous step the roles and features can be installed with Install-WindowsFeature and validated with Get-WindowsFeature afterwards. The list needed is: Web-Windows-Auth, Web-ISAPI-Ext, Web-Metabase, Web-WMI, BITS, RDC, NET-Framework-Features, Web-Asp-Net, Web-Asp-Net45, NET-HTTP-Activation, NET-Non-HTTP-Activ.
Get-WindowsFeature | Where-Object {$_.InstallState -eq 'Installed'}

Display Name                                            Name                       Install State
------------                                            ----                       -------------
[X] File and Storage Services                           FileAndStorage-Services        Installed
    [X] Storage Services                                Storage-Services               Installed
[X] Web Server (IIS)                                    Web-Server                     Installed
    [X] Web Server                                      Web-WebServer                  Installed
        [X] Common HTTP Features                        Web-Common-Http                Installed
            [X] Default Document                        Web-Default-Doc                Installed
            [X] Directory Browsing                      Web-Dir-Browsing               Installed
            [X] HTTP Errors                             Web-Http-Errors                Installed
            [X] Static Content                          Web-Static-Content             Installed
            [X] HTTP Redirection                        Web-Http-Redirect              Installed
        [X] Health and Diagnostics                      Web-Health                     Installed
            [X] HTTP Logging                            Web-Http-Logging               Installed
            [X] Logging Tools                           Web-Log-Libraries              Installed
            [X] Request Monitor                         Web-Request-Monitor            Installed
            [X] Tracing                                 Web-Http-Tracing               Installed
        [X] Performance                                 Web-Performance                Installed
            [X] Static Content Compression              Web-Stat-Compression           Installed
        [X] Security                                    Web-Security                   Installed
            [X] Request Filtering                       Web-Filtering                  Installed
            [X] Windows Authentication                  Web-Windows-Auth               Installed
        [X] Application Development                     Web-App-Dev                    Installed
            [X] .NET Extensibility 3.5                  Web-Net-Ext                    Installed
            [X] .NET Extensibility 4.8                  Web-Net-Ext45                  Installed
            [X] ASP.NET 3.5                             Web-Asp-Net                    Installed
            [X] ASP.NET 4.8                             Web-Asp-Net45                  Installed
            [X] ISAPI Extensions                        Web-ISAPI-Ext                  Installed
            [X] ISAPI Filters                           Web-ISAPI-Filter               Installed
    [X] Management Tools                                Web-Mgmt-Tools                 Installed
        [X] IIS Management Console                      Web-Mgmt-Console               Installed
        [X] IIS 6 Management Compatibility              Web-Mgmt-Compat                Installed
            [X] IIS 6 Metabase Compatibility            Web-Metabase                   Installed
            [X] IIS 6 WMI Compatibility                 Web-WMI                        Installed
[X] .NET Framework 3.5 Features                         NET-Framework-Features         Installed
    [X] .NET Framework 3.5 (includes .NET 2.0 and 3.0)  NET-Framework-Core             Installed
    [X] HTTP Activation                                 NET-HTTP-Activation            Installed
    [X] Non-HTTP Activation                             NET-Non-HTTP-Activ             Installed
[X] .NET Framework 4.8 Features                         NET-Framework-45-Fea...        Installed
    [X] .NET Framework 4.8                              NET-Framework-45-Core          Installed
    [X] ASP.NET 4.8                                     NET-Framework-45-ASPNET        Installed
    [X] WCF Services                                    NET-WCF-Services45             Installed
        [X] TCP Port Sharing                            NET-WCF-TCP-PortShar...        Installed
[X] Azure Arc Setup                                     AzureArcSetup                  Installed
[X] Background Intelligent Transfer Service (BITS)      BITS                           Installed
    [X] IIS Server Extension                            BITS-IIS-Ext                   Installed
[X] Microsoft Defender Antivirus                        Windows-Defender               Installed
[X] Remote Differential Compression                     RDC                            Installed
[X] Remote Server Administration Tools                  RSAT                           Installed
    [X] Feature Administration Tools                    RSAT-Feature-Tools             Installed
        [X] BITS Server Extensions Tools                RSAT-Bits-Server               Installed
[X] System Data Archiver                                System-DataArchiver            Installed
[X] Windows PowerShell                                  PowerShellRoot                 Installed
    [X] Windows PowerShell 5.1                          PowerShell                     Installed
    [X] Windows PowerShell 2.0 Engine                   PowerShell-V2                  Installed
[X] Windows Process Activation Service                  WAS                            Installed
    [X] Process Model                                   WAS-Process-Model              Installed
    [X] .NET Environment 3.5                            WAS-NET-Environment            Installed
    [X] Configuration APIs                              WAS-Config-APIs                Installed
[X] WoW64 Support                                       WoW64-Support                  Installed
[X] XPS Viewer                                          XPS-Viewer                     Installed
Set Firewall Rules
Install ADK and PE Add-On
- Download the latest version of the ADK and ADK WinPE setup from Microsoft. These are updated with major Windows updates so change often.
- Run adksetup.exe and select Install the Windows Assessment and Deployment Kit to this computer. If running on multiple systems, it may be worthwhile to download to a centralized location to save some time.
- Determine if you want to allow Microsoft to collect data.
- Click Next and accept the license.
- Select which features should be intalled. At a minimum select Deployment Tools, Windows Preinstallation Envirornment, and the User State Migration Toolkit (USMT).
- Run adkwinpesetup.exe and keep all defaults. If you didn't allow the ADK to collect data, this should persist for the PE Add-ons.
Install SQL Components
Make sure to log into the server as a domain account with administrator. Using the local administrator makes permissions later very fun.
SQL Server 2019
- Download and launch SQL Server 2019 Evaluation Edition.
- Pick Custom for installation type.
- Provide a path to download the installation media. and click Install. This will download about 1.5 GB so will take a moment.
- Once completed, the SQL Server Installation Center will launch. Click Installation on the left menu
- Select 'New SQL Server stand-alone installation or add features to an existing installation'.
- I use the Evaluation copy of SQL Server. If this were a licensed version, the product key could be entered. Click Next
- Accept the license terms and click Next.
- It is recommended to allow checking for updates during the installation.
- There is a brief check for Install Rules that help identify potential issues. Windows Firewall will warn if it's on. Make sure the necessary rules are in place and click Next.
- On the Feature Selection screen, select the following and press Next.
- Database Engine Services
- SQL Serve Replicaiton
- Full-Text and Semantic Extractions for Search
- Data Quality Services
- Client Tools Connectivity
- Client Tools Backwards Compatibility
- Client Tools SDK
- SQL Client Connectivity SDK
- Master Data Services
- Leave the default instance (MSSQLSERVER) and click Next.
- On Server Configuration specify an account name and password to run SQL Server Agent and SQL Server Database Engine. I generally confirm the default Collation is still SQL_Latin1_General_CP1_CI_AS. Click Next which will validate credentials.
- On the Database Engine Configuration Page there are several settings than can be configured.
- Select Windows Authentication Mode and add the SCCMAdmins group to SQL Server Administrators.
- If this were a production environment, or multiple drives were in use, the Data Directories tab allows you to specify location for the databases, logs, and backup directories.
- TempDB allows you to specify where the TempDB resides and autogrowth settings. The Autogrowth (MB) should be set to 512 MB. The initial size for should also be increased to reserve space and speed up installation.
- The MaxDOP tab allows you to specify the maximum degree of parallelism or how SQL deals with multi-core CPUs.
- SQL Memory settings can be configured to use unlimited or set the Recommended value (max 75% of installed RAM).
- Finish clicking Next and Install to complete the Installation.
SQL Server Management Studio (SSMS)
- From the SQL Server Installation Server, clicking Install SQL Server Management Tools, will take you to a download page for SQL Server Management Studio (SSMS). Download and launch the setup. There are no options that need to be changed unless you are installing to a non-default drive/folder.
SQL Server Reporting Services (SSRS)
- This is another where you can easily find the download link from the SQL Server Installation Center. Download and launch the setup.
- Select Install Reporting Services.
- I select the Evaluation version as I rebuild often. Like the full SQL Server installation you can also specify Developer/Express or provide the SQL key to license if called for.
- Accept the license and click Next.
- Select Install Reporting Services only and click Next.
- Change the installation path if desired and click Install.
- When complete, close the installation as it will be configured later.
If not done so already, now would be a great time to check for updates and reboot servers.
Install Central Administration Site (CAS)
Now that all of the preparation is complete, it is finally time to install the actual Microsoft Configuration Manager Site. While the setup of the Central Administration Site and the Child Primary Sites are very similar, there is enough key differences where I will document them separately. Especially since a lot of time can be saved by using the cd.latest to set up the primaries. If you have been following along, the download media should already be complete from extending the AD Schema. If not, download the install for the Evaluation copy.
Install Child Primary Sites
Once the CAS installation is complete, you are ready to install any child primary sites. As these will be site servers and can actually support clients, there are additional roles that will need to be installed. Since the CAS doesn't directly service clients and orchestrates sies, there are no distribution points, management points, or software update points.
Apply Microsoft Configuration Manager Updates
Now that the site is up and running, it is time to apply the latest Configuration Manager updates. If you enabled the Service Connection Point as part of the installation any new updates should already be available. By default, this role will periodically check for updates and download them. There is an option to run it in an off-line mode and require running the ServiceConnectionTool.exe command line tool from cd.latest\SMSSETUP\TOOLS\ServiceConnectionTool.
- Launch the Configuration Manager Console with an account with administrative rights.
- Go to Administration > Updates and Servicing.
- From this pane you can see CM updates, Hotfixes, and Hotfix Rollups. The most recent update should show a State of 'Ready to install'.
- Right click the latest update and select 'Run prerequisite check.' This will run about 125 checks to validate everything should work when the upgrade is in place.
- Either click 'Show Status' in the bottom right under Related Objects or navigate to Monitoring > Updates and Servicing Status. Right click the Update Package and select Show Status.
- The prerequisite check does take a while to start and run the tests so be patient and grab a cup of coffee or spam refresh as often as desired. Content needs to be download and replicated before the checks begin so if nothing has moved in a bit, check distmgr.log for signs of movement. Closing the console and relaunching may be necessary to show correct status.
- In my lab the ODBC Driver 18 for SQL Server failed. This was a simple fix by downloading and running https://go.microsoft.com/fwlink/?linkid=2220989. Some warnings can safely be ignored as they are for features that are not in use or for upcoming feature depreciation that will require attention. Once any failures or warnings have been remediated you can run the check again if desired.
- If there are warnings that you plan on ignoring at this point, go back to Administration > Updates and Services and install the Update Pack from the ribbon or right click menu. Ignore any perquisite check warnings.
- Review the features and make changes if necessary.
- On Client Update Settings you can specify whether to automatically update all clients in the site or validate in a pre-production collection that you specify before rolling it out to everyone else.
- Accept the license terms.
- As Cloud Attach has not been set up yet, uncheck the box to enable it.
- Review the summary and click Next.
- Monitoring can be done the same way as the prerequisite check. As replication completed for the previous step install should kick off much faster but several of the steps do take a while. From past experiences as long as it starts going it is a fine line between watching the status and chasing the logs and maintaining sanity. There are many steps that may fail because a previous step isn't done and will need to wait 5 minutes until it retries which will generate a lot of warnings/errors in the logs but they are to be expected. I generally step away and check back periodically rather than watching status real time.
- At some point the SMS Provider will be updated and the console will need to be restarted and updated to the latest version.
- Once the CAS is updated, any downstream servers will automatically update as well.