New Tenant Setup
- Creating a Trial Account
- Configuring Custom Domain Name
- Update Users to allow signing in with Custom Domain
- Turn off Security Defaults
- Configure Autopilot Pre-requisites
Creating a Trial Account
Microsoft used to offer a developer account which allowed multiple licenses for testing and development. This is no longer offered so for this lab, I have created a new trial subscription which will be used for testing projects being worked on. For the activities an M365 Business Premium subscription should suffice. After visiting Microsoft 365 Business Premium | Microsoft 365 and starting a trial an account is ready to go. Note this account will require domain.onmicrosoft.com to sign in the first time as well as MFA to be configured.
Understanding Microsoft 365 licenses is not a simple task but the Microsoft 365 Business Premium license includes the following components:
- Office 365 E3 (O365 E3) - Office Applications, DLP, Exchange Online, Graph Connector, Teams, OneDrive, SharePoint, etc.
- Enterprise Mobility & Security E3 (EMS E3) - Intune Plan 1 + Entra ID Plan 1
- Windows Professional
A very useful site I often use to decipher M365 subscription is Microsoft 365 Business Premium | M365 Maps which covers all of the components included in these pieces. For more detailed comparisons they offer the matrix that compares all of the features across the most common subscriptions Feature Matrix | M365 Maps.
Configuring Custom Domain Name
Like with most things, there are multiple ways this can be done. I am most familiar with setting this up from the Microsoft Admin Center but it can also be done from within the Entra ID Blade.
To do it from the Admin Center:
- Navigate to https://admin.microsoft.com > Settings (may need to Show All) > Domains.
- Click + Add domain.

- Enter the domain you would like to add. In order to validate ownership of the domain an administrator of the DNS entries will need to add a TXT or MX record to domain's DNS. Additionally, a text file can be added to the domain's website. Microsoft will provide a value for the selected value to add, for example add a TXT record for @ set to MS=ms12723280 or an MX record pointing to ms13612190.msv1.invalid.
- Once the record has been added and domain ownership has been verified, Microsoft will prompt for various DNS entries to get the tenant working as well as ask if you plan on using additional services and providing the additional entries needed for those.
- MX record so external mail servers know where to deliver mail to.
- A TXT record for SPF. Sender Protection Framework allows you to specify where mail is allowed to be sent from as a minimal form of anti-spoofing. For Microsoft 365 this will point to v=spf1 include:spf.protection.outlook.com -all. Additional servers may be added to the include section for bulk mailing of newsletters or some email archiving.
- A CNAME pointing to autodiscover.outlook.com so Outlook can automatically detect configuration for the mail servers.
- Two CNAME records for DKIM which is DomainKeys Identified Mail which signs outgoing mail with a rotating key to provide authenticity of the sender and prove it was not tampered with in transit.
- The record for DMARC or Domain-based Message Authentication, Reporting, and Conformance is not provided. This mail protection instructs receiving mail servers what to do and where to report to if SPF and/or DKIM fail. Tools like MxToolbox (DMARC Record Generator - Create DMARC DNS Records - MxToolbox) or other similar tools can help adjust the options available.
- For Intune two CNAME records for enrolling and registering devices.

To add the domain from the Entra Admin Center:
- Navigate to https://entra.microsoft.com > Settings > Domain names.
- Click + Add custom domain
-

- Enter the domain you would like to add.
- Select whether to add a TXT record or MX record (note that this does not allow you to add the text file to the website).
- This will validate the ownership but not provide the additional entries to add but is easier to make the primary domain.

Update Users to allow signing in with Custom Domain
Any users created prior to adding the custom domain and setting it as the default will have a domain.onmicrosoft.com user principal name (UPN). While this works for signing in and receiving mail does not look great. The custom domain adds a more professional look and will be easier for anyone logging in or emailing users to work. Like most things there are multiple ways this can be achieved.
Microsoft 365 Admin Center:
Entra ID Portal:
Azure Portal:
Turn off Security Defaults
Newly created tenants have a set of default security settings in place to help protect smaller organizations who may not be experienced in configuring necessary protections for Microsoft 365. However, with these defaults configured a number of the security settings are also disabled. These defaults require all users to register with multi-factor authentications (MFA), enforces MFA for those with administrative roles, MFA required for other users when needed, blocking legacy authentication protocols, and protections for some admin portals. If the defaults are left enabled, conditional access rules can't be enabled so these will need to be disabled if desired. More details can be found at Providing a default level of security in Microsoft Entra ID - Microsoft Entra | Microsoft Learn.
- To disable the security defaults, navigate to https://portal.azure.com.
- Go to the Microsoft Entra ID blade.
- Expand Manage > Properties.
- At the bottom of the page select "Manage security defaults".

- Select Disabled from the dropdown. Microsoft warns that MFA and security are important and requires a justification for disabling the defaults. In this case, we want to leverage Conditional Access Policies.

-
Save the changes and confirm again you really want to disable the defaults.
- If you selected the option to replace security defaults with Conditional Access policies, 4 rules will be created and enabled out of the box. These can't be deleted but can be turned off if replaced with similar rules.
- Block legacy authentication
- Multifactor authentication for Azure Management
- Multifactor authentication for admins
- Multifactor authentication for all users


Configure Autopilot Pre-requisites
As this tenant is going to be used to test Autopilot scenarios there are a few pre-requisites needed as documented in Windows Autopilot requirements | Microsoft Learn. In particular in a fairly open network without several controls, the configuration section is where most of the preparation work will be needed.
Configure Microsoft Entra automatic enrollment
The first piece is to allow devices to be automatically enrolled in Intune. This is done through the Entra portal.
- Navigate to Entra ID > Mobility (MDM and WIP) > and select Intune which should take you to Microsoft Intune - Microsoft Azure.
- Our MDM user scope is going to be left at the default of All as this is a test scenario. A particular group(s) could be configured with Some to specify which users can enroll in Intune.
-
Note this applies to both Entra joined corporate owned devices and bring your own device.
-
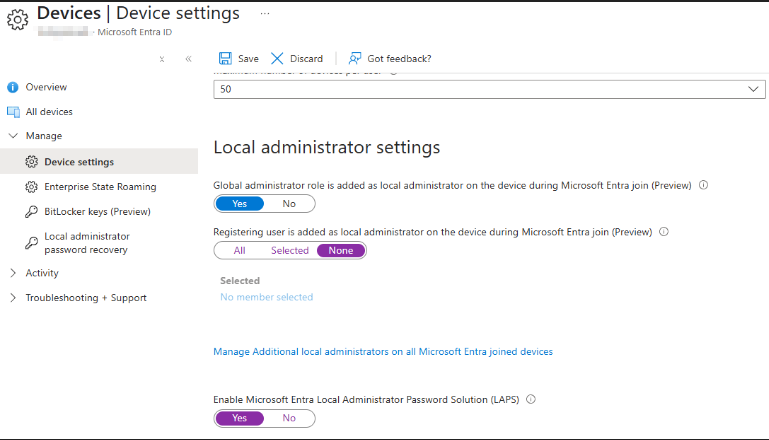
- Configure Device Settings. Under Entra ID > Manage > Devices > Device Settings Devices - Microsoft Azure you can also specify all or select groups for Join and Registration. We will leave the default of All users allowed to do both. The setting to join a device can be overridden with Conditional Access policies so can be left at No and still require MFA.
- We will leave the Global Admin groups as a local admin on the workstation but not allow the registering user to be added as local admin.
- As additional users that are not Global Admins will need rights select Manage Additional local administrators or all Microsoft Entra joined devices.

- This will allow selected users and/or groups to be added. This will add the users to the Microsoft Entra Joined Device Local Administrator role which grants some read permissions. Device Administrators - Microsoft Azure
- As we'll be using LAPS to manage local admin passwords we'll toggle on the setting while here.
- Save the settings
Step up from Windows Pro to Enterprise
Windows subscription activation | Microsoft Learn
Configure Microsoft Entra Custom Branding
Add company branding to your organization's sign-in page - Microsoft Entra | Microsoft Learn
Device Registration
For the Windows 11 systems that will be utilized to be enrolled and eligible for Autopilot, a hardware hash will need to be updated. There are a few ways that this can be done documented in Configure Windows Autopilot profiles | Microsoft Learn, I will be using a script published by Microsoft to upload the hashes directly to Intune. The article below has the following code snippet that can be used:
[Net.ServicePointManager]::SecurityProtocol = [Net.SecurityProtocolType]::Tls12
 Set-ExecutionPolicy -Scope Process -ExecutionPolicy RemoteSigned
 Install-Script -Name Get-WindowsAutopilotInfo -Force
 Get-WindowsAutopilotInfo -Online
The first time this is executed on a device some prompts are needed to install the necessary components for NuGet and the script as well as a one-time registration to grant admin consent. This does also include the WindowsAutopilotIntune module.
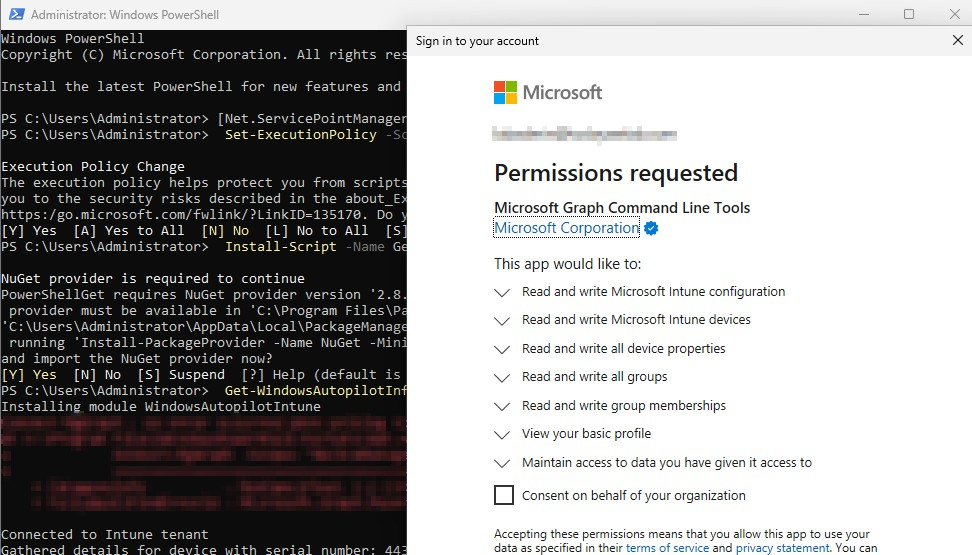
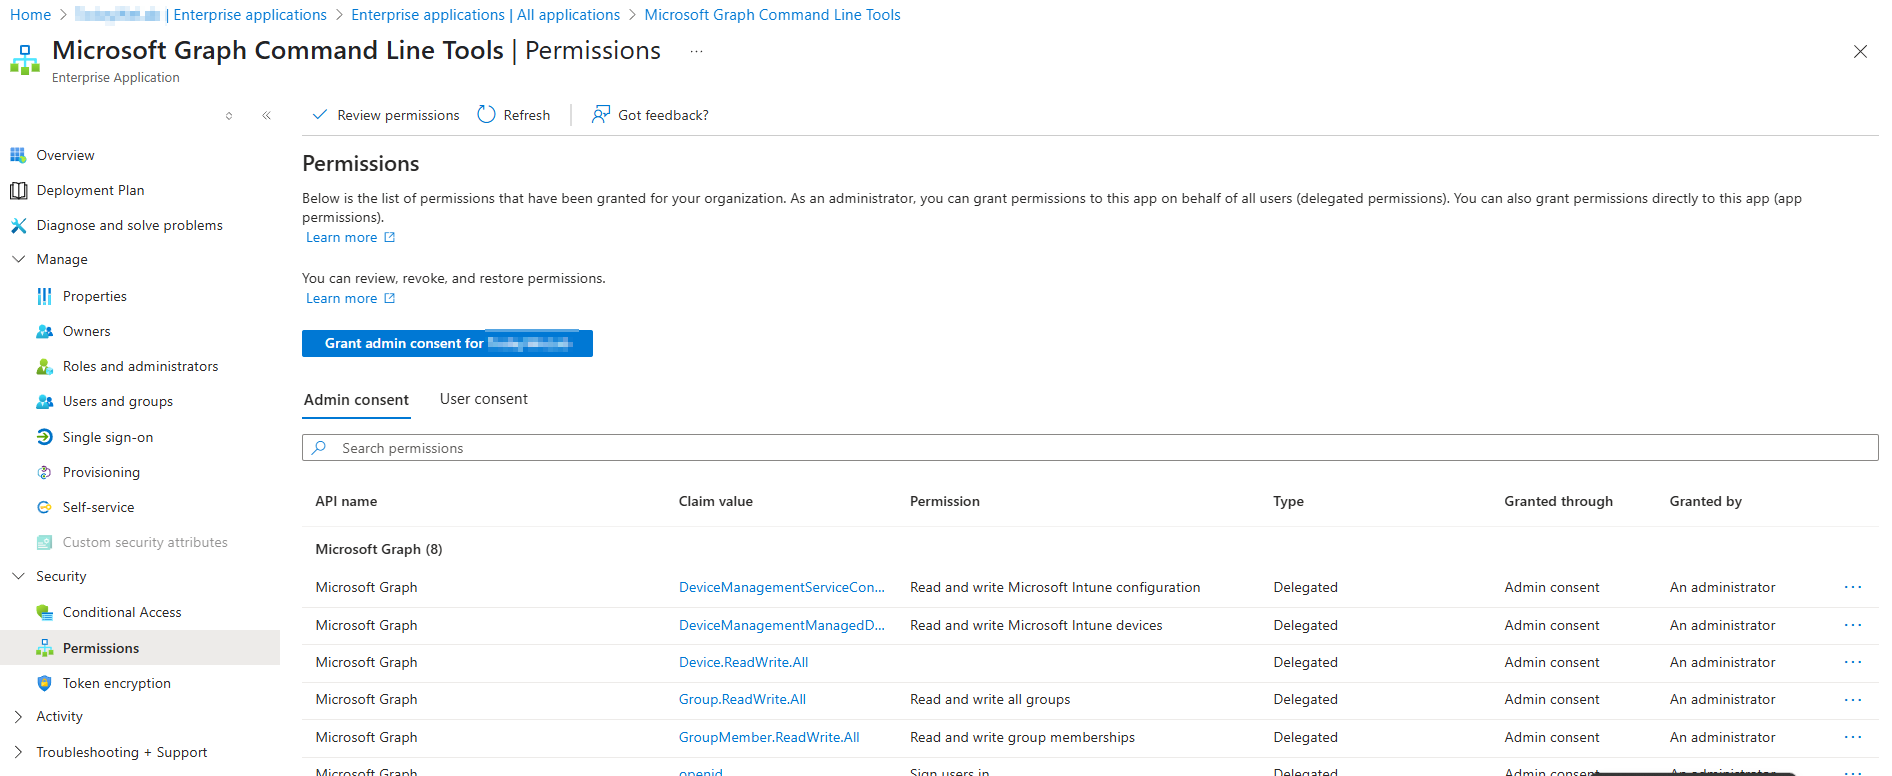
After consenting on behalf of the organization, an Enterprise Registration with the required permissions.
Once the script completes you can see the Serial number, make, and model of the device in Windows Autopilot devices - Microsoft Intune admin center. Additional details can be found here: Windows Autopilot user-driven Microsoft Entra join - Step 3 of 8 - Register devices as Windows Autopilot devices | Microsoft Learn